Introduction: Learning how to make AI animation has never been easier. Creating animations once required expensive software, years of practice, and advanced technical skills. Artists had to draw thousands of frames, build 3D models, animate characters manually, and spend countless hours editing every scene. Not long ago, creating animated videos seemed out of reach for most beginners because it often required expensive software, technical skills, and countless hours of work.
Today, things have changed dramatically.
Thanks to artificial intelligence, almost anyone can create impressive animated videos without learning traditional animation techniques. Best Modern AI animation tools can generate characters, animate images, create realistic camera movements, produce AI voices, and even edit complete videos—all from simple text prompts.
Whether you want to create YouTube videos, Instagram Reels, TikTok clips, marketing videos, educational content, animated explainers, or short films, AI can significantly reduce the time and effort required.
However, many beginners still ask the same question:
How do you actually make AI animation from start to finish?
That’s exactly what this guide will teach you.
Instead of simply listing software, you’ll learn the complete workflow—from planning your idea to publishing your finished animation. Even if you’ve never created an animation before, you can follow these steps and produce your first AI-powered video.
By the end of this guide, you’ll understand:
- How AI animation works
- Which AI tools beginners should use
- How to write effective prompts
- How to generate consistent characters
- How to animate scenes using AI
- How to add AI voices and background music
- How to edit your animation professionally
- How to publish videos for YouTube and social media
Whether you’re a content creator, marketer, educator, freelancer, student, or business owner, this guide will help you create AI animations faster, more efficiently, and with greater creative control.
Quick Answer: How to Make AI Animation
Creating AI animation is easier than ever thanks to modern AI-powered tools. The basic process involves planning your idea, choosing the right AI animation software, generating characters and scenes, animating them using text-to-video or image-to-video technology, adding AI-generated voiceovers and music, editing everything together, and exporting the final video.
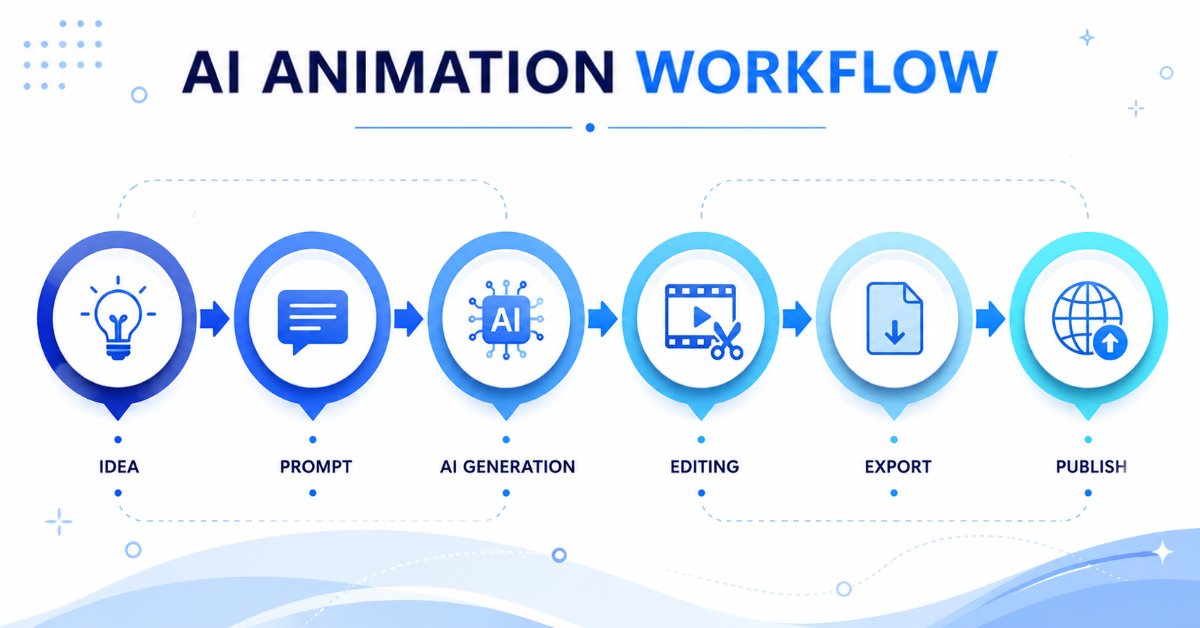
Here’s the complete workflow:
- Plan your animation idea.
- Write a short script.
- Create a storyboard.
- Generate characters and backgrounds with AI.
- Animate each scene using an AI animation tool.
- Add AI voices, music, and sound effects.
- Edit the clips into a complete video.
- Export and publish your animation.
Choosing the right platform can make your animation workflow much easier. Explore our detailed guide to the best AI animation tools to compare features, pricing, free plans, and the ideal solutions for beginners and professionals.
Key Takeaways (TL;DR)
Before diving into the step-by-step process, here are the most important things you should know:
- AI animation allows anyone to create animated videos without drawing or coding skills.
- Most AI animation tools work directly in your web browser, so you don’t need a high-end computer.
- Start with a simple 30–60 second project instead of attempting a long animation.
- Image-to-video workflows usually provide more consistent results than generating an entire video from text alone.
- Well-written prompts significantly improve animation quality.
- Editing is still an essential part of producing professional-looking AI animations.
- Many AI animation tools offer free plans, making it possible to create your first animation without spending money.
- AI speeds up the creative process, but your storytelling, planning, and editing decisions still have the biggest impact on the final result.
What Is AI Animation?
AI animation is the process of using artificial intelligence to create animated videos, moving characters, visual effects, and cinematic scenes with minimal manual effort.
Instead of animating every movement frame by frame, AI models analyze your text prompts, images, or videos and automatically generate realistic motion, camera angles, transitions, voices, and visual effects.
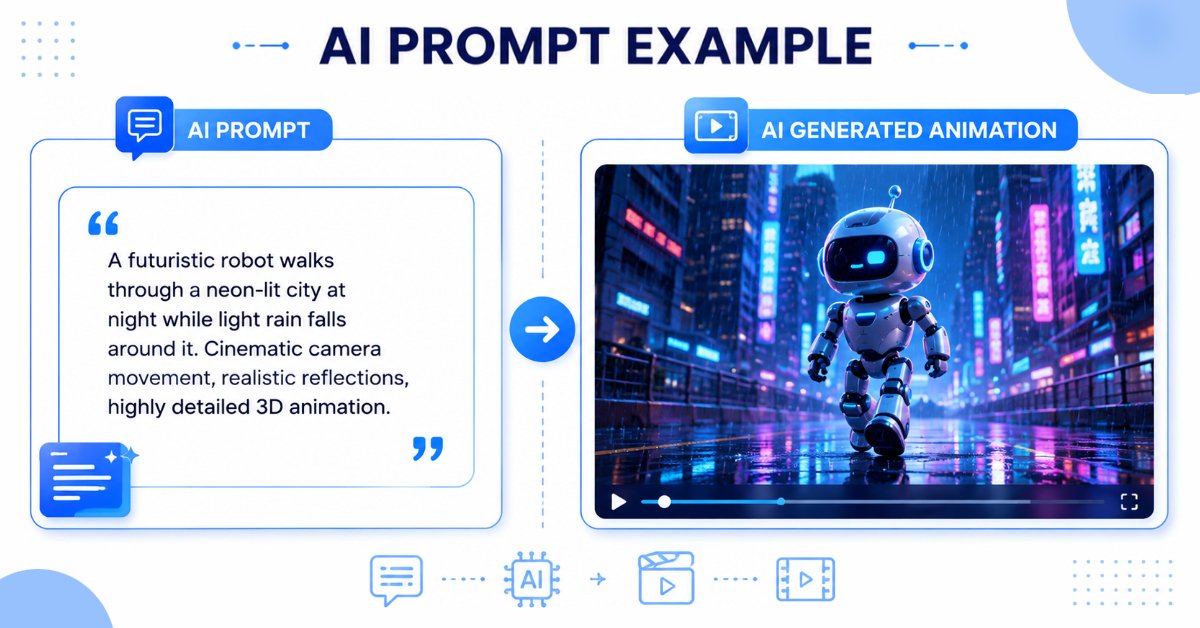
For example, rather than manually animating a walking robot, you could simply enter a prompt like:
“A small futuristic robot walks through a neon-lit city at night while light rain falls around it. Cinematic camera movement, realistic reflections, highly detailed 3D animation.”
Within minutes, an AI animation generator can produce a short animated clip based on that description.
Today’s AI animation software can help you:
- Generate videos from text prompts
- Animate still images
- Create AI-generated characters
- Produce realistic camera movements
- Add lip-syncing and facial expressions
- Generate AI voiceovers
- Create subtitles automatically
- Remove backgrounds
- Edit videos using AI-powered tools
This technology has dramatically reduced the time needed to produce high-quality animated content, making animation accessible to creators of all experience levels.
How Does AI Animation Work?
AI animation works by combining artificial intelligence, machine learning, and generative AI models to transform your ideas into animated videos. Instead of manually drawing every frame, AI analyzes your text prompts, images, or existing videos and automatically generates movement, camera effects, characters, and scenes.
While the process may seem complex behind the scenes, it can be understood in five simple steps.
Step 1: Enter a Text Prompt or Upload an Image
Every AI animation project begins with an instruction. You can either type a detailed text prompt describing the scene you want to create or upload an existing image that you want the AI to animate.
For example, you might enter:
“A futuristic robot walking through a neon-lit city at sunset, cinematic camera movement, realistic lighting.”
The more specific your prompt is, the better the AI can understand your creative vision.
Step 2: AI Processes Your Input
After receiving your prompt, the AI analyzes different elements such as:
- The subject (person, animal, object, etc.)
- The action or movement
- The background or environment
- Lighting conditions
- Art style
- Camera angle
- Overall mood
Using trained machine learning models, the AI predicts how these elements should appear and move together to create a natural-looking animation.
Step 3: Generate the Animation
Once the AI has processed your instructions, it creates a sequence of video frames that form the animation.
Depending on the tool, this could involve:
- Text-to-video generation
- Image-to-video animation
- Character animation
- AI camera movements
- Lip-syncing
- Visual effects
Many platforms allow you to generate several versions of the same scene, making it easy to choose the best result.
Step 4: Edit and Refine the Video
AI generates the initial animation, but editing helps transform it into a polished final product.
At this stage, you can:
- Trim unwanted sections
- Rearrange scenes
- Add transitions
- Insert AI voiceovers
- Include background music
- Add subtitles and sound effects
- Adjust colors and timing
These refinements improve both the visual quality and the storytelling.
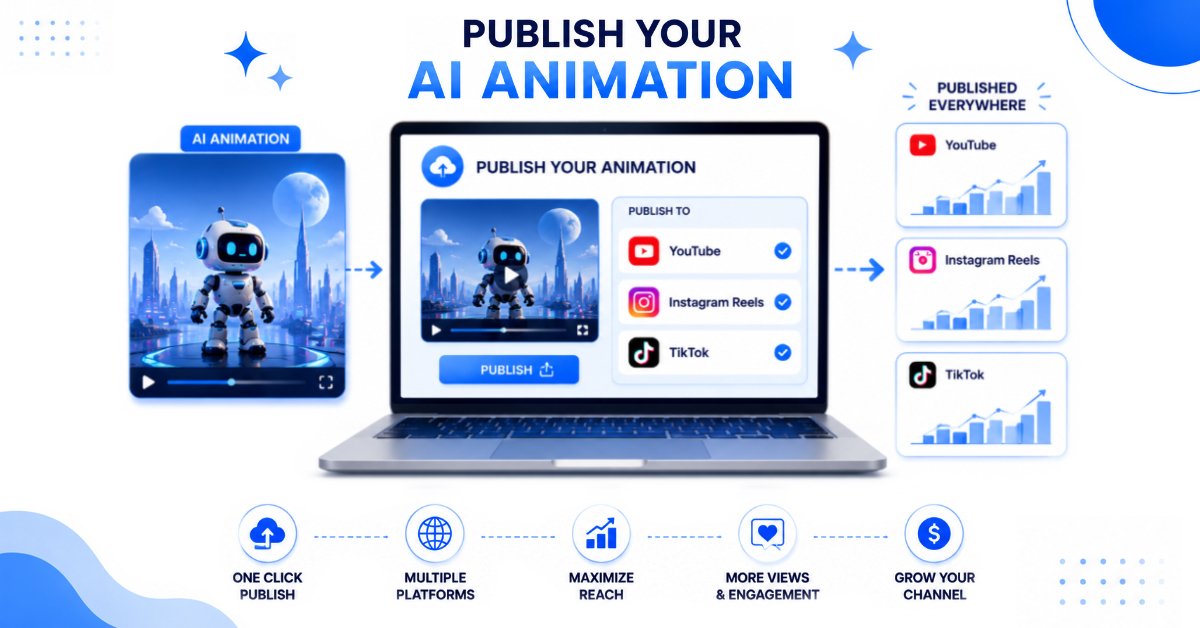
After reviewing your project, export the animation in a suitable format such as MP4.
You can then publish it on platforms like:
- YouTube
- YouTube Shorts
- Instagram Reels
- TikTok
Many AI animation tools also let you export in different aspect ratios, making it easier to optimize your videos for each platform.
Practical Tip
Think of AI animation as a creative assistant rather than a replacement for your ideas. While AI can generate impressive visuals and motion, the quality of the final animation still depends on your planning, prompt writing, storytelling, and editing decisions. The best results usually come from combining AI’s speed with your creativity.
Why Use AI Animation in 2026?
AI animation has evolved from an experimental technology into a practical creative tool used by millions of people worldwide. In 2026, creators are using AI to produce content faster, lower production costs, and explore ideas that would have been difficult or expensive to create using traditional animation methods.
Here are some of the biggest advantages of AI animation:
Faster Content Creation
Traditional animation projects can take weeks or even months to complete. AI animation tools automate many repetitive tasks—such as generating scenes, creating motion, syncing voiceovers, and applying visual effects—allowing creators to produce videos in a fraction of the time.
Lower Production Costs
Hiring professional animators or purchasing advanced animation software can be expensive. Many AI animation platforms provide free plans or affordable subscriptions, making it easier for individuals, freelancers, educators, and small businesses to create high-quality animations on a budget.
Beginner-Friendly Workflows
Modern AI animation tools are designed for users with little or no animation experience. Many platforms include intuitive interfaces, templates, and AI assistants that simplify the creative process, allowing beginners to focus on storytelling instead of technical details.
Greater Creative Flexibility
Whether you’re creating YouTube Shorts, product demonstrations, educational explainers, animated advertisements, or cinematic storytelling videos, AI offers multiple workflows—including text-to-video, image-to-video, AI avatars, and motion capture—to suit different creative goals.
Improved Productivity
Rather than replacing human creativity, AI acts as a creative assistant. It handles repetitive tasks while allowing you to concentrate on writing better stories, refining ideas, and producing engaging content.
Practical Tip: If you’re completely new to AI animation, begin with a 15–30 second video. Short projects are easier to manage, faster to edit, and help you understand the complete workflow before moving on to longer animations.
What You’ll Need Before You Start
One of the biggest advantages of AI animation is that you don’t need a professional animation studio or an expensive workstation. Most modern AI tools run in the cloud and work directly from your web browser.
Here’s a simple toolkit to get started:
| Tool Category | Purpose | Beginner-Friendly Options |
| Script Writing | Plan your story and dialogue | Google Docs, Microsoft Word, Notion |
| AI Image Generator | Create characters and backgrounds | Leonardo AI, Bing Image Creator, Adobe Firefly |
| AI Animation Tool | Animate images or generate videos | Runway, Pika, Luma Dream Machine, Kling |
| AI Voice Generator | Create narration and dialogue | ElevenLabs, Murf AI |
| Video Editor | Combine clips and add effects | CapCut, DaVinci Resolve, Adobe Premiere Pro |
| AI Music Generator (Optional) | Background music | Suno AI, Udio |
You don’t need every tool on day one. Many beginners successfully create their first AI animation using just an AI animation platform, a free voice generator, and a simple video editor.
The key is to keep your first project simple, focus on learning the workflow, and gradually experiment with more advanced tools as your confidence grows.
Step 1: Choose the Right AI Animation Tool
The first step is selecting an AI animation platform that matches your goals. While dozens of AI animation tools are available, not every platform is ideal for beginners.
Some focus on realistic AI-generated videos, while others are better suited for cartoon animations, social media content, marketing videos, or cinematic storytelling.
Ask Yourself These Questions First
Before choosing a tool, consider:
- Do you want to create realistic or cartoon-style animations?
- Are you making YouTube videos, Shorts, or TikTok content?
- Do you need AI voice generation?
- Do you want text-to-video or image-to-video features?
- What’s your budget?
Answering these questions helps you avoid paying for features you don’t need.
Recommended AI Animation Tools for Beginners
| Tool | Best For | Free Plan | Difficulty |
| Runway | Professional AI videos | Limited | ⭐⭐⭐ |
| Pika | Social media animations | Yes | ⭐⭐ |
| Kling AI | Realistic cinematic videos | Limited | ⭐⭐⭐ |
| Luma Dream Machine | High-quality motion | Yes | ⭐⭐ |
| Canva AI | Marketing videos | Yes | ⭐ |
| Adobe Firefly | Creative assets | Limited | ⭐⭐⭐ |
Beginner Recommendation: If this is your first AI animation project, start with Pika or Luma Dream Machine. Both have beginner-friendly interfaces and require very little technical knowledge.
Which Workflow Should You Choose?
There are two common AI animation workflows.
Text-to-Video
You describe an entire scene using text.
Example:
“A cute panda riding a bicycle through a bamboo forest during sunset, cinematic lighting, highly detailed animation.”
The AI creates the video from scratch.
Best for:
- Storytelling
- Creative videos
- Short animations
- Marketing content
Image-to-Video
Instead of generating everything from text, you first create an image and then animate it.
This workflow usually produces:
- More consistent characters
- Better backgrounds
- More predictable motion
- Higher-quality results
For beginners, image-to-video is often the easier and more reliable option because you control the visual style before adding movement.
Step 2: Write an Effective Prompt
Your prompt is one of the biggest factors influencing the quality of your AI-generated animation.
Think of it as giving clear instructions to a professional filmmaker. The more specific you are, the better the AI understands your vision.
Poor Prompt
Robot walking.
The AI has too many gaps to fill in, leading to unpredictable results.
Better Prompt
A small rusty robot with glowing blue eyes slowly walks through an abandoned greenhouse at sunrise. Cinematic lighting, realistic reflections, gentle camera movement, detailed 3D animation, emotional atmosphere.
Notice how the second prompt provides details about:
- Subject
- Environment
- Lighting
- Mood
- Camera movement
- Visual style
This level of detail helps the AI generate more consistent and visually appealing animations.
Prompt Formula for Beginners
A simple formula you can follow is:
Subject + Action + Location + Style + Lighting + Camera Movement + Mood
Example:
Young astronaut + floating through space + colorful galaxy + Pixar-style animation + soft blue lighting + slow cinematic zoom + inspiring atmosphere.
Using a consistent formula also makes it easier to recreate the same character or scene later.
Tips for Better Prompts
- Describe the subject clearly.
- Mention the animation style (3D, anime, watercolor, Pixar-inspired, etc.).
- Include lighting conditions.
- Specify camera movement if needed.
- Describe emotions or atmosphere.
- Keep prompts natural and descriptive rather than stuffing keywords.
Pro Tip: Save your best prompts in a document. Reusing and refining successful prompts will speed up future projects and improve consistency.
If you’re struggling to write detailed prompts or animation scripts, AI writing assistants can help you generate creative ideas, improve descriptions, and refine your prompts. Explore our guide to the best AI writing tools for students to discover beginner-friendly tools that can make prompt writing faster and more effective.
Step 3: Create Characters and Backgrounds
Before animating, you need a consistent visual style.
Instead of generating random scenes one by one, first create the main character, supporting characters, and key backgrounds.
This helps maintain continuity throughout your animation.
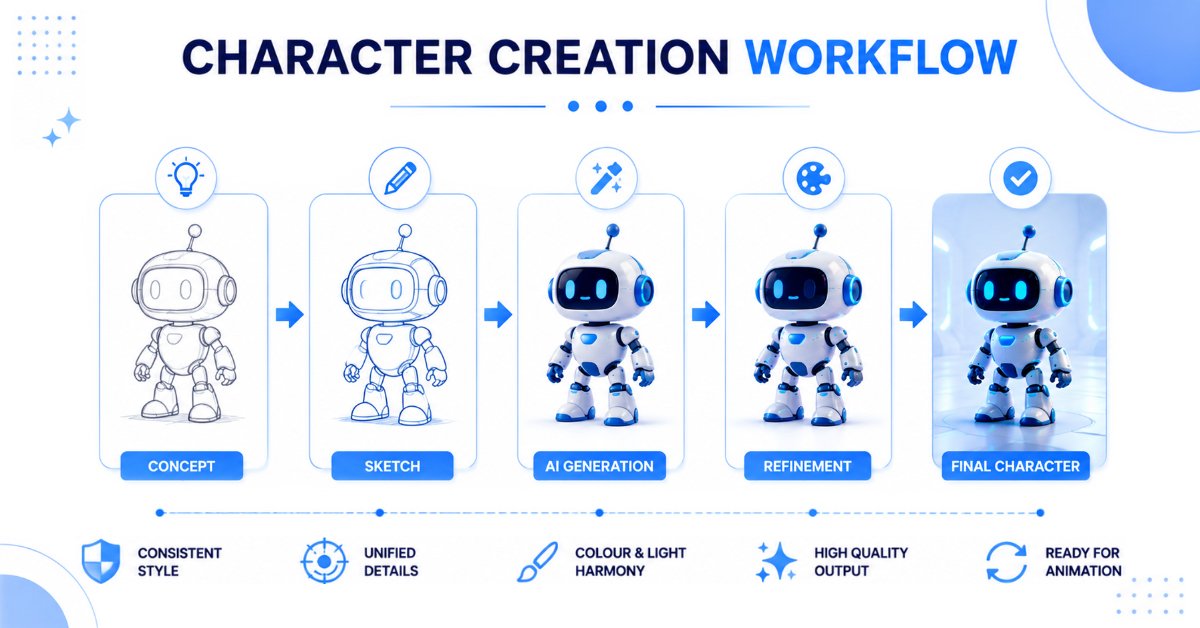
Generate Your Main Character
Start by creating several versions of your main character.
Example prompt:
A friendly young explorer wearing a blue jacket and brown backpack, short black hair, expressive face, Pixar-inspired 3D style, cinematic lighting, ultra-detailed.
Generate multiple images and choose the version that best matches your story.
Create Backgrounds
Design each location separately.
For example:
- Forest
- Classroom
- Futuristic city
- Coffee shop
- Space station
Keeping backgrounds consistent makes your animation look much more professional.
Build a Style Sheet
One mistake many beginners make is changing their prompts too much between scenes.
Instead, create a simple style sheet containing:
- Character description
- Art style
- Color palette
- Camera style
- Lighting style
Use this information in every prompt to maintain visual consistency.
Organize Your Assets
Create folders such as:
Project
│
├── Characters
├── Backgrounds
├── Audio
├── Storyboard
├── AI Videos
└── Final Export
A well-organized project saves time during editing and makes it easier to update or expand your animation later.
Step 4: Animate Your Scenes with AI
Now it’s time to bring your characters and environments to life.
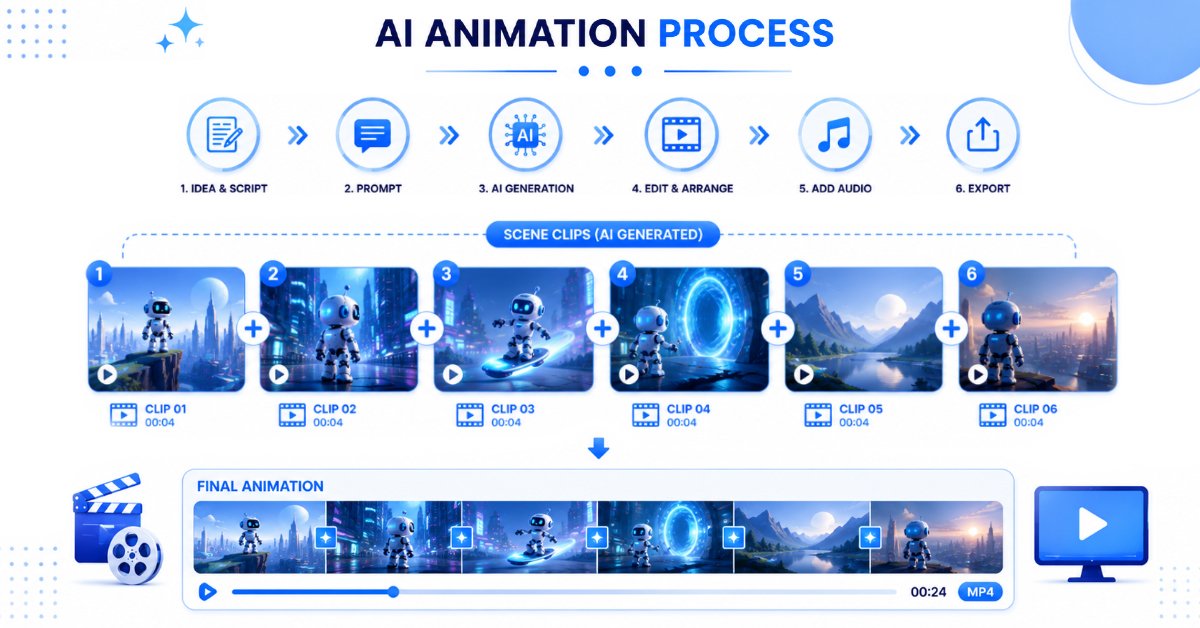
Rather than generating an entire video in one attempt, animate each scene individually. This gives you more control over timing, pacing, and visual quality.
Generate Short Clips
Aim for clips that are 3–8 seconds long.
Short clips are:
- Easier to edit
- Faster to regenerate
- More visually consistent
- Simpler to combine into a polished final video
Trying to generate a full one-minute animation in a single prompt often results in inconsistent characters, awkward motion, or unexpected scene changes.
Add Camera Movement
Most AI animation tools support cinematic camera movements.
Examples include:
- Slow zoom
- Pan left or right
- Orbit around the subject
- Dolly-in
- Crane shot
Subtle camera motion often looks more professional than fast, dramatic movements.
Generate Multiple Versions
Don’t settle for the first output.
Generate several versions of the same scene and compare them.
Look for:
- Smooth movement
- Consistent characters
- Natural lighting
- Stable backgrounds
- Good facial expressions
Selecting the best version often produces a noticeably stronger final animation.
Review Every Scene
Before moving to the next shot, ask yourself:
- Does the character still look the same?
- Is the lighting consistent?
- Does the movement feel natural?
- Does the scene match the storyboard?
- Would this transition smoothly into the next clip?
Fixing small issues now saves significant editing time later.
Practical Example Workflow
Let’s say you’re creating a 30-second animation about a robot discovering a flower.
Your project could look like this:
| Scene | Action | Duration |
| 1 | Robot wakes up inside an abandoned greenhouse | 5 seconds |
| 2 | Robot notices a glowing flower | 4 seconds |
| 3 | Close-up of the flower blooming | 5 seconds |
| 4 | Robot gently smiles and reaches toward the flower | 6 seconds |
| 5 | Wide cinematic shot of the greenhouse filled with light | 8 seconds |
Breaking your story into individual scenes gives you far more creative control than trying to generate the entire animation in a single step.
Practical Experience Tip
If your first AI-generated animation doesn’t look the way you expected, don’t be discouraged. AI animation tools often produce different results from the same prompt because factors like wording, camera instructions, and scene complexity can affect the output.
Instead of rewriting your entire prompt, make one small change at a time—such as adjusting the camera angle, lighting, motion, or character description—and generate the scene again. This gradual approach makes it easier to understand what improves the result and helps you build better prompting skills over time.
Step 5: Add AI Voice, Music, and Sound Effects
Your animation may look great, but without good audio it can still feel incomplete. Voiceovers, background music, and sound effects add emotion, improve storytelling, and keep viewers engaged.
Fortunately, AI has made audio production much easier. You can generate realistic voices, create royalty-free music, and even add sound effects without hiring voice actors or musicians.
Generate AI Voiceovers
AI voice generators can convert your script into natural-sounding speech within minutes.
When choosing a voice:
- Match the voice to your character or audience.
- Use a conversational tone.
- Avoid robotic-sounding voices whenever possible.
- Add pauses where appropriate for more natural delivery.
If your animation includes multiple characters, use different voice styles so viewers can easily distinguish between them.
Example:
A young explorer might use an energetic voice, while a wise narrator could use a calm and confident tone.
If you’re looking for realistic AI-generated narration, the official ElevenLabs Voice Library lets you explore different voice styles and languages before choosing one for your project.
Add Background Music
Music helps create the right mood.
Choose music based on your story:
| Animation Type | Recommended Music |
| Adventure | Cinematic orchestral |
| Funny | Upbeat and cheerful |
| Educational | Light instrumental |
| Horror | Dark ambient |
| Motivational | Inspiring cinematic |
| Kids Animation | Happy and playful |
Avoid music that overpowers your narration. The voice should always remain clear and easy to understand.
Include Sound Effects
Small sound effects make animations feel much more realistic.
Examples include:
- Footsteps
- Wind
- Rain
- Birds
- Door opening
- Button clicks
- Fire
- Water
- Magic effects
- Crowd ambience
Even subtle sounds can significantly improve the viewing experience.
Sync Everything Properly
Before moving on, make sure:
- Dialogue matches character movements.
- Background music supports the scene instead of distracting from it.
- Sound effects occur at the correct moment.
- Audio volume is balanced throughout the video.
Practical Tip: Practical Tip: After finishing your edit, play the animation once without looking at the screen. Focus only on the narration, music, and sound effects. If the story is still easy to follow, your audio is likely clear and well balanced. If the story is still easy to follow from the audio alone, your voiceover and sound design are probably working well.
Step 6: Edit Your AI Animation Like a Professional
AI generates clips, but editing is where your animation becomes a complete story.
A polished edit improves pacing, removes awkward moments, and creates a smoother viewing experience.
Import All Assets
Create a new project in your preferred video editor.
Import:
- AI-generated video clips
- Voiceovers
- Background music
- Sound effects
- Logos (if applicable)
- Intro and outro
Keeping everything organized makes editing much easier.
Arrange the Story
Follow your storyboard.
Instead of asking:
“Which clip looks coolest?”
Ask:
“Does this scene help tell the story?”
Good storytelling always beats flashy visuals.
Trim Unnecessary Frames
AI videos often begin or end with unnecessary movements.
Trim:
- Awkward starts
- Frozen frames
- Unwanted camera movement
- Strange facial expressions
Small edits make the animation feel much more polished.
Use Simple Transitions
Many beginners overuse transitions.
Instead, stick to:
- Hard cuts
- Fade in
- Fade out
- Cross dissolve
Simple transitions usually look more professional than flashy effects.
Add Titles and Captions
Captions improve accessibility and increase engagement, especially on mobile devices.
Include:
- Opening title
- Character names (if needed)
- Scene titles (optional)
- English subtitles
- Closing call-to-action
Captions also help viewers who watch videos with the sound muted.
Color Correction
If different AI clips have slightly different colors or lighting, apply basic color correction to create a consistent look.
Adjust:
- Brightness
- Contrast
- Saturation
- White balance
You don’t need cinematic color grading—just enough to make the scenes feel cohesive.
Step 7: Export and Publish Your Animation
Once you’re happy with the final edit, it’s time to export your project.
Recommended Export Settings
| Setting | Recommendation |
| Resolution | 1920 × 1080 (Full HD) |
| Format | MP4 |
| Frame Rate | 30 FPS (or 60 FPS if supported) |
| Codec | H.264 |
| Audio | AAC |
These settings work well for most social media platforms.
Before publishing your animation, it’s a good idea to review YouTube’s official video upload recommendations to ensure your video meets the platform’s quality and format guidelines.
Choose the Correct Aspect Ratio
Different platforms use different video formats.
| Platform | Aspect Ratio |
| YouTube | 16:9 |
| YouTube Shorts | 9:16 |
| TikTok | 9:16 |
| Instagram Reels | 9:16 |
| 1:1 or 16:9 | |
| 16:9 |
Export the correct version for your audience instead of resizing later.
Review Before Publishing
Watch your video one final time.
Check:
- Spelling mistakes
- Subtitle accuracy
- Audio quality
- Character consistency
- Scene order
- Logo placement
- Ending screen
A five-minute review can prevent publishing errors.
Best AI Animation Tools Comparison (2026)
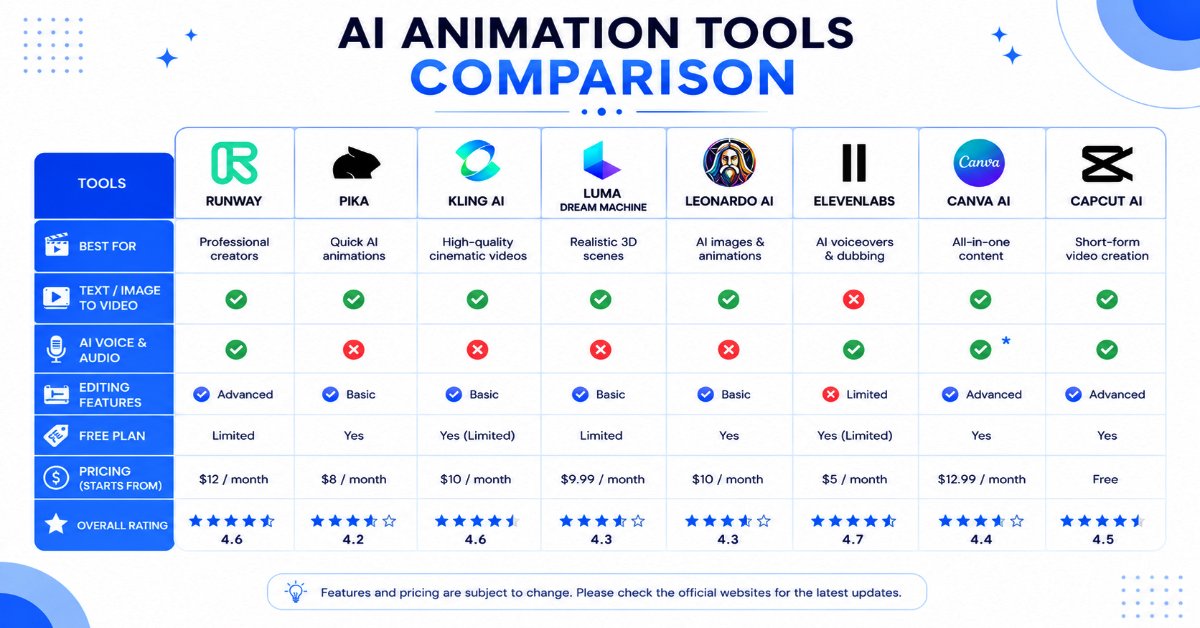
| Tool | Free Plan | Text-to-Video | Image-to-Video | AI Voice | Ease of Use | Best For |
| Runway | Limited | ✅ | ✅ | ❌ | ⭐⭐⭐⭐☆ | Professional creators |
| Pika | Yes | ✅ | ✅ | ❌ | ⭐⭐⭐⭐⭐ | Beginners |
| Kling AI | Limited | ✅ | ✅ | ❌ | ⭐⭐⭐⭐☆ | Cinematic videos |
| Luma Dream Machine | Yes | ✅ | ✅ | ❌ | ⭐⭐⭐⭐⭐ | Realistic motion |
| Leonardo AI | Yes | ❌ | Image generation | ❌ | ⭐⭐⭐⭐⭐ | Characters & backgrounds |
| ElevenLabs | Yes | ❌ | ❌ | ✅ | ⭐⭐⭐⭐⭐ | AI narration |
| Canva AI | Yes | Limited | Limited | Limited | ⭐⭐⭐⭐⭐ | Marketing & social media |
| CapCut AI | Yes | Limited | Limited | Limited | ⭐⭐⭐⭐⭐ | Short-form content |
If you’re comparing different AI video generation platforms, the Runway documentation provides detailed information about supported features and workflows.
Common Mistakes Beginners Make
Learning from common mistakes can save you hours of frustration.
1. Starting With a Long Project
Trying to create a five-minute animation as your first project usually leads to burnout.
Start with a 15–30 second animation instead.
2. Writing Vague Prompts
A prompt like:
“A robot walking.”
gives the AI very little information.
Instead, describe:
- Character
- Environment
- Style
- Lighting
- Camera movement
- Mood
Specific prompts almost always produce better results.
3. Changing the Art Style Between Scenes
If one scene is realistic and the next is anime-style, the animation feels inconsistent.
Use the same visual style throughout the project.
4. Ignoring Storytelling
Beautiful visuals cannot replace a good story.
Before generating anything, ask:
- Who is the main character?
- What is their goal?
- What challenge do they face?
- How does the story end?
Even a simple story keeps viewers engaged.
5. Overusing Visual Effects
Too many camera movements, transitions, or effects can distract from the story.
Sometimes, a clean and simple edit has the greatest impact.
6. Publishing Without Reviewing
Many beginners upload their animation immediately after exporting it.
Always watch the final version once before publishing.
You’ll often catch small issues that are easy to fix.
Pro Tips for Better AI Animations
After experimenting with different AI animation workflows, these habits consistently lead to better results.
Keep a Prompt Library
Save your best prompts in a document. Reusing successful prompts helps maintain consistency and speeds up future projects.
Build a Reusable Asset Library
Organize:
- Characters
- Backgrounds
- Music
- Logos
- Sound effects
- Intro animations
This reduces production time for future videos.
Generate More Than You Need
Create multiple versions of important scenes.
Having several options allows you to choose the strongest clips during editing.
Follow Current Trends
Watch successful AI-generated videos on platforms like YouTube Shorts, Instagram Reels, and TikTok to understand popular editing styles, pacing, and storytelling techniques. Adapt ideas creatively rather than copying them.
Keep Learning
AI animation tools evolve rapidly. New features, models, and workflows appear frequently, so continue experimenting and learning to improve your skills over time.
What to Do After Your First AI Animation
Congratulations! If you’ve completed your first AI animation, you’ve already learned the most important part of the process—turning an idea into a finished video. Now it’s time to build on that foundation and continue improving your skills.
Here are a few practical ways to take your AI animation journey to the next level:
Create Longer Stories
Once you’re comfortable creating 15–30 second videos, gradually increase the length of your projects. Try creating:
- One-minute storytelling videos
- Educational explainers
- Product demonstrations
- Short animated films
- YouTube intros and outros
Longer projects will help you improve your storytelling, editing, and scene transitions.
Experiment with Different Animation Styles
Don’t limit yourself to one visual style. Explore different creative approaches such as:
- 3D animation
- Anime-inspired visuals
- Cartoon characters
- Watercolor illustrations
- Cinematic realism
- Clay animation style
- Pixel art animation
Experimenting with styles helps you discover what best matches your content and audience.
Improve Your Prompt Writing
Prompt engineering is one of the most valuable AI skills you can develop.
Try experimenting with:
- Different camera angles
- Lighting conditions
- Character expressions
- Weather effects
- Motion intensity
- Art styles
Small changes to your prompts can dramatically improve the quality of your AI-generated animations.
Build Your Own Character Library
If you plan to create a series of animations, save your:
- Character descriptions
- Reference images
- Prompt templates
- Color palettes
- Background designs
Maintaining a consistent visual identity makes your future projects look more professional.
Stay Updated with New AI Features
AI animation technology evolves rapidly. New models, editing tools, and creative features are introduced regularly.
Spend a little time each month exploring updates from the tools you use. Even a single new feature can significantly improve your workflow.
Practice Regularly
Like any creative skill, improvement comes through consistent practice.
Challenge yourself to create one short animation every week. Each project will teach you something new about storytelling, prompting, editing, or visual design.
Frequently Asked Questions (FAQs)
1. What is the easiest AI animation tool for beginners?
If you’re just getting started, tools like Pika, Luma Dream Machine, and Canva AI are excellent choices. They offer intuitive interfaces, browser-based workflows, and require little or no prior animation experience.
2. Can I make AI animations for free?
Yes. Many AI animation platforms offer free plans that are suitable for learning and creating short videos. However, free plans often include usage limits, watermarks, or lower export quality. As your projects become more advanced, a paid plan may provide additional features and higher-quality outputs.
3. Which is better: Text-to-Video or Image-to-Video?
Both approaches have their advantages.
● Text-to-video is ideal for quickly generating new ideas or creative scenes.
● Image-to-video usually offers better character consistency and more control over the final animation.
Many creators combine both workflows to achieve the best results.
4. Can I upload AI-generated videos to YouTube?
Yes. YouTube allows AI-assisted content as long as it complies with its Community Guidelines and other applicable policies. If your video includes realistic AI-generated or altered content that could mislead viewers, review YouTube’s latest disclosure requirements before publishing.
5. Can I monetize AI-generated animations?
In many cases, yes. You can monetize AI-assisted content on platforms like YouTube if it adds original value and follows platform policies. You should also review the licensing and commercial-use terms of the AI tools you use, especially if your videos include AI-generated music, voices, or images.
6. What computer do I need for AI animation?
Most modern AI animation tools run in the cloud, so you don’t need a powerful workstation. A standard laptop or desktop with a reliable internet connection is usually sufficient for beginners.
7. How long does it take to create an AI animation?
The time depends on the complexity of the project. A simple 30-second animation can often be completed in a few hours, while longer videos may require additional time for planning, generation, editing, and revisions.
8. Is AI animation legal?
Very popular.
9. Which AI animation tool is best for YouTube?
Another high-intent query.
Final Thoughts
AI animation has transformed the creative process by making animation faster, more accessible, and easier to learn than ever before. Whether you’re a student, content creator, marketer, educator, freelancer, or business owner, you no longer need years of animation experience to bring your ideas to life.
The key to success is not using the most expensive software—it’s building a simple, repeatable workflow. Start with a clear idea, write effective prompts, generate consistent visuals, edit carefully, and keep experimenting with new techniques as your skills grow.
Your first animation doesn’t have to be perfect. Every project teaches you something new, and each completed video brings you one step closer to creating professional-quality AI animations.
If you’re still deciding which platform to use, explore our detailed guide to 15 Best AI Animation Tools in 2026 (Free & Paid AI Animation Generators Compared). It compares the leading AI animation tools, their features, pricing, and ideal use cases to help you choose the right solution for your next project.
The best way to learn AI animation is by creating something small. Don’t wait until you know every tool or every prompt. Open an AI animation platform, experiment with a simple idea, and improve with each project. Consistent practice will help you build both confidence and creativity over time.
Now it’s your turn—pick a simple idea, open your favorite AI animation tool, and create your first animated video today.